ECDIS: safety settings and alarms
Work out and set the safety depth and contour, the display and the look-ahead, and see the anti-grounding alarm work.
- Phase 1: The bridge, one piece of equipment at a time
- 7 steps on the bridge
- 5 oral questions
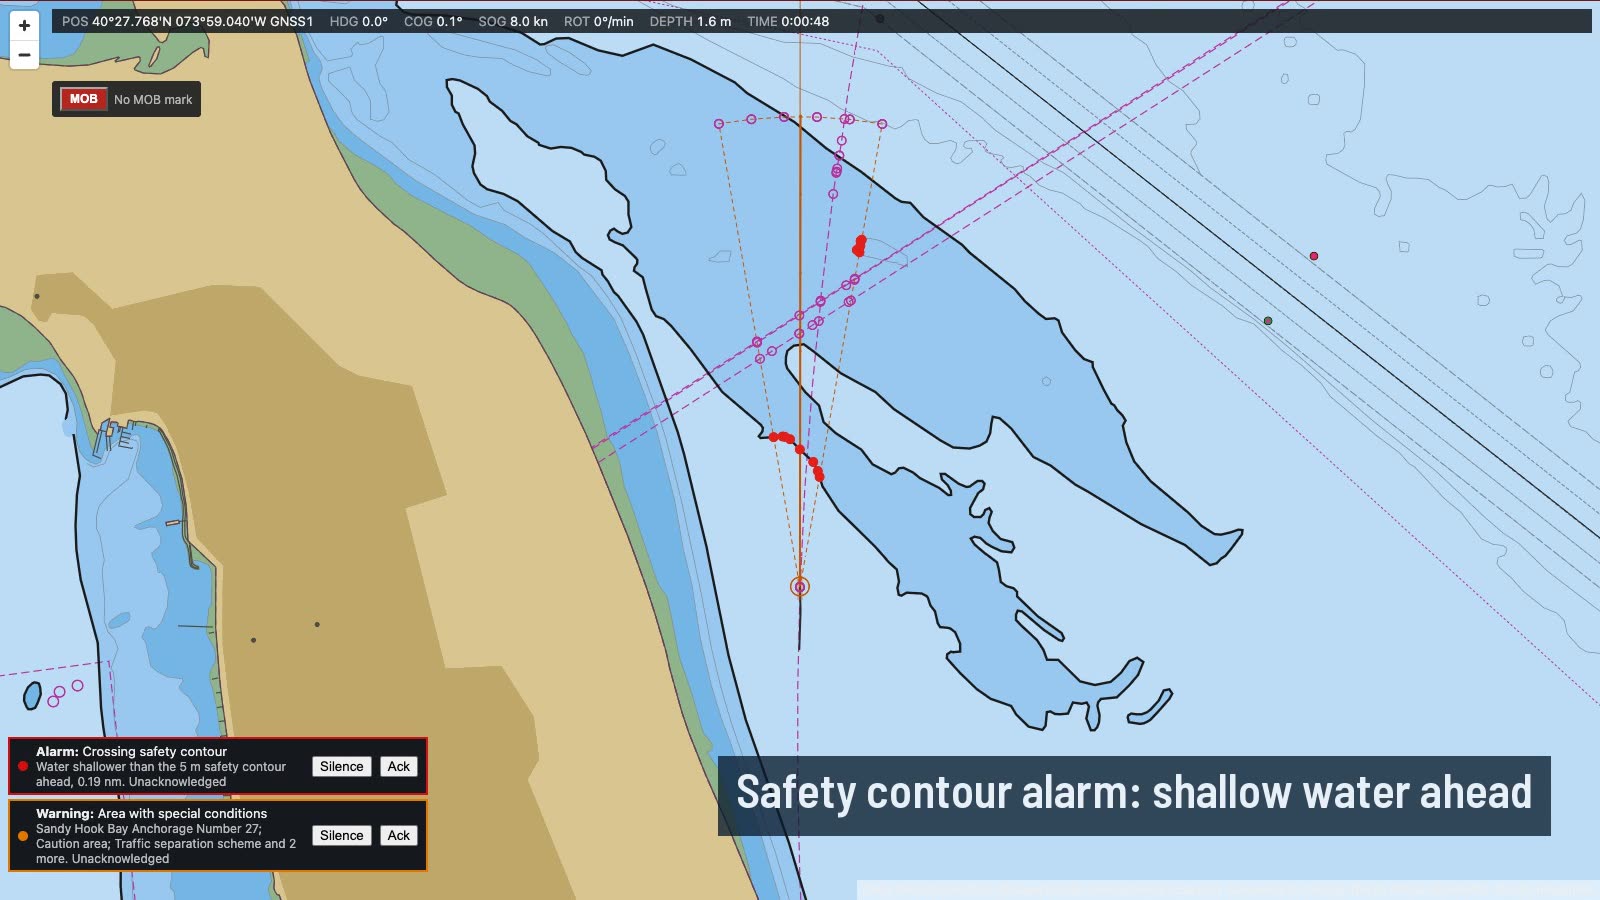
What you do on the bridge
- Safety depth
- Safety contour
- Shallow and deep contours
- Display category
- Look-ahead
- Audible alerts
- See the alarm work
The oral questions, and what a good answer covers
The key points are in our own words. In the course, these questions come once you have done the job.
How do you choose the safety contour and safety depth, and what does the ECDIS do with each?Often asked
A good answer covers:
- Start from the draught, add the under keel clearance the company or master requires, and allow for squat and the tide relied on
- Safety depth: soundings at or shallower than it are shown bold, as a warning
- Safety contour: the line between safe and unsafe water; the anti-grounding alarm and the route check work from it
- If the chosen value is not in the chart data, the ECDIS uses the next deeper contour and says so
You take over the watch and look at the ECDIS. What's wrong with this picture?Often asked
A good answer covers:
- The default safety contour is in use: nobody set it for this ship
- Base display: soundings and many dangers are hidden
- A one minute look-ahead gives no time to act
- Audible alerts are off
Show me on the bridgeThe settings as the last user left them. What is wrong?
How do you set the look-ahead, and why does it matter?Often asked
A good answer covers:
- It is the area ahead the ECDIS searches for the safety contour, dangers and special areas
- Long enough to take action in time at the speed you are making, set by time or distance
- Wide enough to cover the yaw and the set, but not so wide it alarms all the time in a channel
- Too short or too narrow and the alarm comes too late; switched off it never comes at all
What are the dangers of over-reliance on the ECDIS?Often asked
A good answer covers:
- It is only as good as the chart data, the position input and the settings
- Cross-check the position by another means: radar, visual bearings, the echo sounder
- Watch for overscale, wrong datum, missing cells and the CATZOC of the data
- Keep a proper lookout and a radar watch: the screen is not the window
- Know the back-up arrangements and practise them
What are the Base, Standard and All display categories, and which do you use?
A good answer covers:
- Standard: what the ECDIS shows by default for route planning and monitoring, adding buoys, lights, traffic schemes and more
- All: everything, including spot soundings and cables
- Use Standard as the normal display, with soundings switched on near shallow water; remove clutter with care
- A customised display is flagged on screen
How the lesson runs
The tutor's narration from the lesson, step by step. On the bridge, each control lights up as it is named.
Brief
Before we go on, look at the ECDIS. The last user left it on the default safety contour, the Base display, a one minute look-ahead and the alarms silent. Groundings have happened with exactly that.
We'll work out the safety depth and contour from our draught and the standing orders, set the display and the look-ahead, switch the alarms on and then see the anti-grounding alarm work.
Safety depth
Our draught is 3.9 metres and the standing orders want 1.5 metres under the keel. So the safety depth is 5.4 metres. Rounding up to 6 is fine. Set it in the ECDIS settings.
Safety contour
Now the safety contour, the line between safe and unsafe water. Set it to at least the safety depth. The chart only holds certain contours, so look at what Showing says: that's the one the alarms really use.
Shallow and deep contours
The shallow and deep contours only shade the water, to give the picture depth. Put the shallow contour near our draught, about 4 metres, and the deep contour at about twice the safety contour.
Display category
Base shows only the bare minimum. It leaves out soundings and many dangers. Choose Standard, the normal display for monitoring, or All when you need everything.
Look-ahead
One minute ahead is no warning at all. Set the look-ahead by time to at least 6 minutes, and a sector about 10 degrees each side. That gives us time to stop or turn.
Audible alerts
Switch the audible alerts on. An alarm that makes no sound is easy to miss when you are looking out of the window, which is where you should be looking.
See the alarm work
Now listen. The look-ahead sector reaches the shoals to the north of us, inside our safety contour: that's the anti-grounding alarm. Acknowledge it at the alert list.
Then put her on 120 on the autopilot and go dead slow ahead. Once the sector sees only deep water, the alarm clears.
The rules and guidance behind it
- MGN 379 (M+F) Amendment 1: use of electronic navigational aids
Do it, then explain it.
Read the answers here for free. With a pass you work this lesson on the bridge, then practise its questions and mark your answers.